Linux常用系统定制
Note
符号说明:
SDK$:指代源码路径
console$:泛指主板的命令行控制台。
ADB$:Android Debug Bridge 命令行工具,泛指可运行 ADB 的环境
SCP 文件传输
1. 用法提示
usage: scp [-346ABCOpqRrsTv] [-c cipher] [-D sftp_server_path] [-F ssh_config]
           [-i identity_file] [-J destination] [-l limit]
           [-o ssh_option] [-P port] [-S program] source ... target
2. 快速使用
Note
$local_path:本地文件路径
$username:用户名
$ip:主板ip
$target_path:目标路径
操作示例:
屏幕显示方向配置
- 查看屏幕信息
1. 获取使用帮助
2. 查看屏幕信息
(console)/# xrandr
Screen 0: minimum 320 x 200, current 1920 x 1080, maximum 16384 x 16384
HDMI-1 connected 1920x1080+0+0 (normal left inverted right x axis y axis) 0mm x 0mm
   1920x1080     60.00*+  60.00    50.00    50.00    59.94
   1920x1080i    60.00    50.00    50.00    59.94
   1680x1050     59.88
   1280x1024     75.02    60.02
   1440x900      59.90
   1280x960      60.00
   1360x768      60.02
   1152x864      75.00
   1280x720      60.00    50.00    50.00    59.94
   1024x768      75.03    70.07    60.00
   832x624       74.55
   800x600       72.19    75.00    60.32    56.25
   720x576       50.00    50.00    50.00
   720x480       60.00    60.00    59.94    59.94
   640x480       75.00    72.81    66.67    60.00    59.94    59.94
   720x400       70.08
DSI-1 connected (normal left inverted right x axis y axis)
   800x1280      60.51 +
DP-1 disconnected (normal left inverted right x axis y axis)
- 旋转屏幕显示方向
Note
normal:将显示设备正常的显示。
left:将显示设备逆时针旋转 90 度。
inverted:将显示设备顺时针旋转 90 度。
right:将显示设备旋转 180 度。
设置指定显示设备的旋转方向
操作示例:配置 HDMI-1 显示逆时针旋转 90 度。
- 触摸校准
1. 安装工具
2. 查看 Device 和 ID,可知 goodix-ts 设备id 为 11
3. 重置转置矩阵和校准矩阵,这是关键操作,转置矩阵需要根据屏幕旋转,校准矩阵设置默认值即可
$ xinput set-prop $id --type=float "Coordinate Transformation Matrix" 0 -1 1 1 0 0 0 0 1
// xinput set-prop 11 --type=float "Coordinate Transformation Matrix" 0 -1 1 1 0 0 0 0 1

$ xinput set-prop $id --type=float "libinput Calibration Matrix" 1.0 0.0 0.0 0.0 1.0 0.0 0.0 0.0 1.0
// xinput set-prop 11 --type=float "libinput Calibration Matrix" 1.0 0.0 0.0 0.0 1.0 0.0 0.0 0.0 1.0
修改触摸方向(可根据名字修改) 默认方向
$ xinput set-prop $id 'Coordinate Transformation Matrix' 1 0 0 0 1 0 0 0 1
// xinput set-prop 11 'Coordinate Transformation Matrix' 1 0 0 0 1 0 0 0 1
修改触摸方向(可根据名字修改) 向左90度
$ xinput set-prop $id 'Coordinate Transformation Matrix' 0 -1 1 1 0 0 0 0 1
// xinput set-prop 11 'Coordinate Transformation Matrix' 0 -1 1 1 0 0 0 0 1
修改触摸方向(可根据名字修改) 向右90度
$ xinput set-prop $id 'Coordinate Transformation Matrix' 0 1 0 -1 0 1 0 0 1
// xinput set-prop 11 'Coordinate Transformation Matrix' 0 1 0 -1 0 1 0 0 1
修改触摸方向(可根据名字修改) 旋转180度
$ xinput set-prop $id 'Coordinate Transformation Matrix' -1 0 1 0 -1 1 0 0 1
// xinput set-prop 11 'Coordinate Transformation Matrix' -1 0 1 0 -1 1 0 0 1
4. 开始校准
语言配置
Debian12
修改系统语言,请打开命令行终端,执行以下命令。重新启动使修改生效
- 设置英文语言
$ locale-gen en_US.UTF-8
$ sed -i 's/^# *\(en_US.UTF-8\)/\1/' /etc/locale.gen
$ echo "LANG=en_US.UTF-8" > /etc/default/locale
$ echo "export LC_ALL=en_US.UTF-8" > /etc/profile.d/zh_CN.sh
$ echo "export LANG=en_US.UTF-8" >> /etc/profile.d/zh_CN.sh
$ echo "export LANGUAGE=en_US:en" >> /etc/profile.d/zh_CN.sh
$ reboot
- 设置中文语言
$ locale-gen zh_CN.UTF-8
$ sed -i 's/^# *\(zh_CN.UTF-8\)/\1/' /etc/locale.gen
$ echo "LANG=zh_CN.UTF-8" > /etc/default/locale
$ echo "export LC_ALL=zh_CN.UTF-8" > /etc/profile.d/zh_CN.sh
$ echo "export LANG=zh_CN.UTF-8" >> /etc/profile.d/zh_CN.sh
$ echo "export LANGUAGE=zh_CN:zh" >> /etc/profile.d/zh_CN.sh
$ reboot
时区配置
Tip
命令执行完成后,需重启才能生效。
- 设置时区亚洲/上海
- 设置时区美国/纽约
网络配置
- 临时配置:使用
ifconfig和route命令(临时设置),这种方法在系统重启后会失效,但可以快速测试固定 IP 的配置。
1. 使用 ifconfig 命令设置 IP 地址、子网掩码和广播地址:
操作示例:
Note
命令解析:
sudo:以管理员权限运行命令。
ifconfig:用于配置网络接口。
eth0:网络接口名称,通过 ifconfig -a 网络接口名称,可能是 eth0、ens33 或其他名称。
<IP 地址>:你想要设置的固定 IP 地址。
<子网掩码>:通常是 255.255.255.0 或其他子网掩码。
<广播地址>:根据 IP 地址和子网掩码计算得出,对于 192.168.1.100 和 255.255.255.0 的子网掩码,广播地址是 192.168.1.255。
2. 使用 route 命令设置网关:
Note
route:用于配置路由。
add default gw <网关地址>:添加默认网关。
<网关地址>:你的网络网关地址。
操作示例:
- 长期配置:使用
/etc/network/interfaces文件(长期设置)可以实现长期稳定的固定 IP 配置。
1. 编辑 /etc/network/interfaces 文件
2. 添加或修改网络接口配置:
auto eth0
iface eth0 inet static
   address 192.168.1.100
   netmask 255.255.255.0
   gateway 192.168.1.1
   # 如果需要设置 DNS 服务器,可以添加以下行
   dns-nameservers 8.8.8.8 8.8.4.4
Note
auto eth0:表示在系统启动时自动启用 eth0 接口。
iface eth0 inet static:表示 eth0 接口使用静态 IP 配置。
address:设置 IP 地址。
netmask:设置子网掩码。
gateway:设置网关。
dns-nameservers:设置 DNS 服务器,这里使用了 Google 的 DNS 服务器,你可以使用其他 DNS 服务器,如 114.114.114.114 等。
3. 保存并退出编辑器,在 vi 中,点击键盘 ++ESC++ 键,输入:wq ,++ENTER++键保存并退出。
4. 重启网络服务或系统
或直接重启系统
WIFI 热点
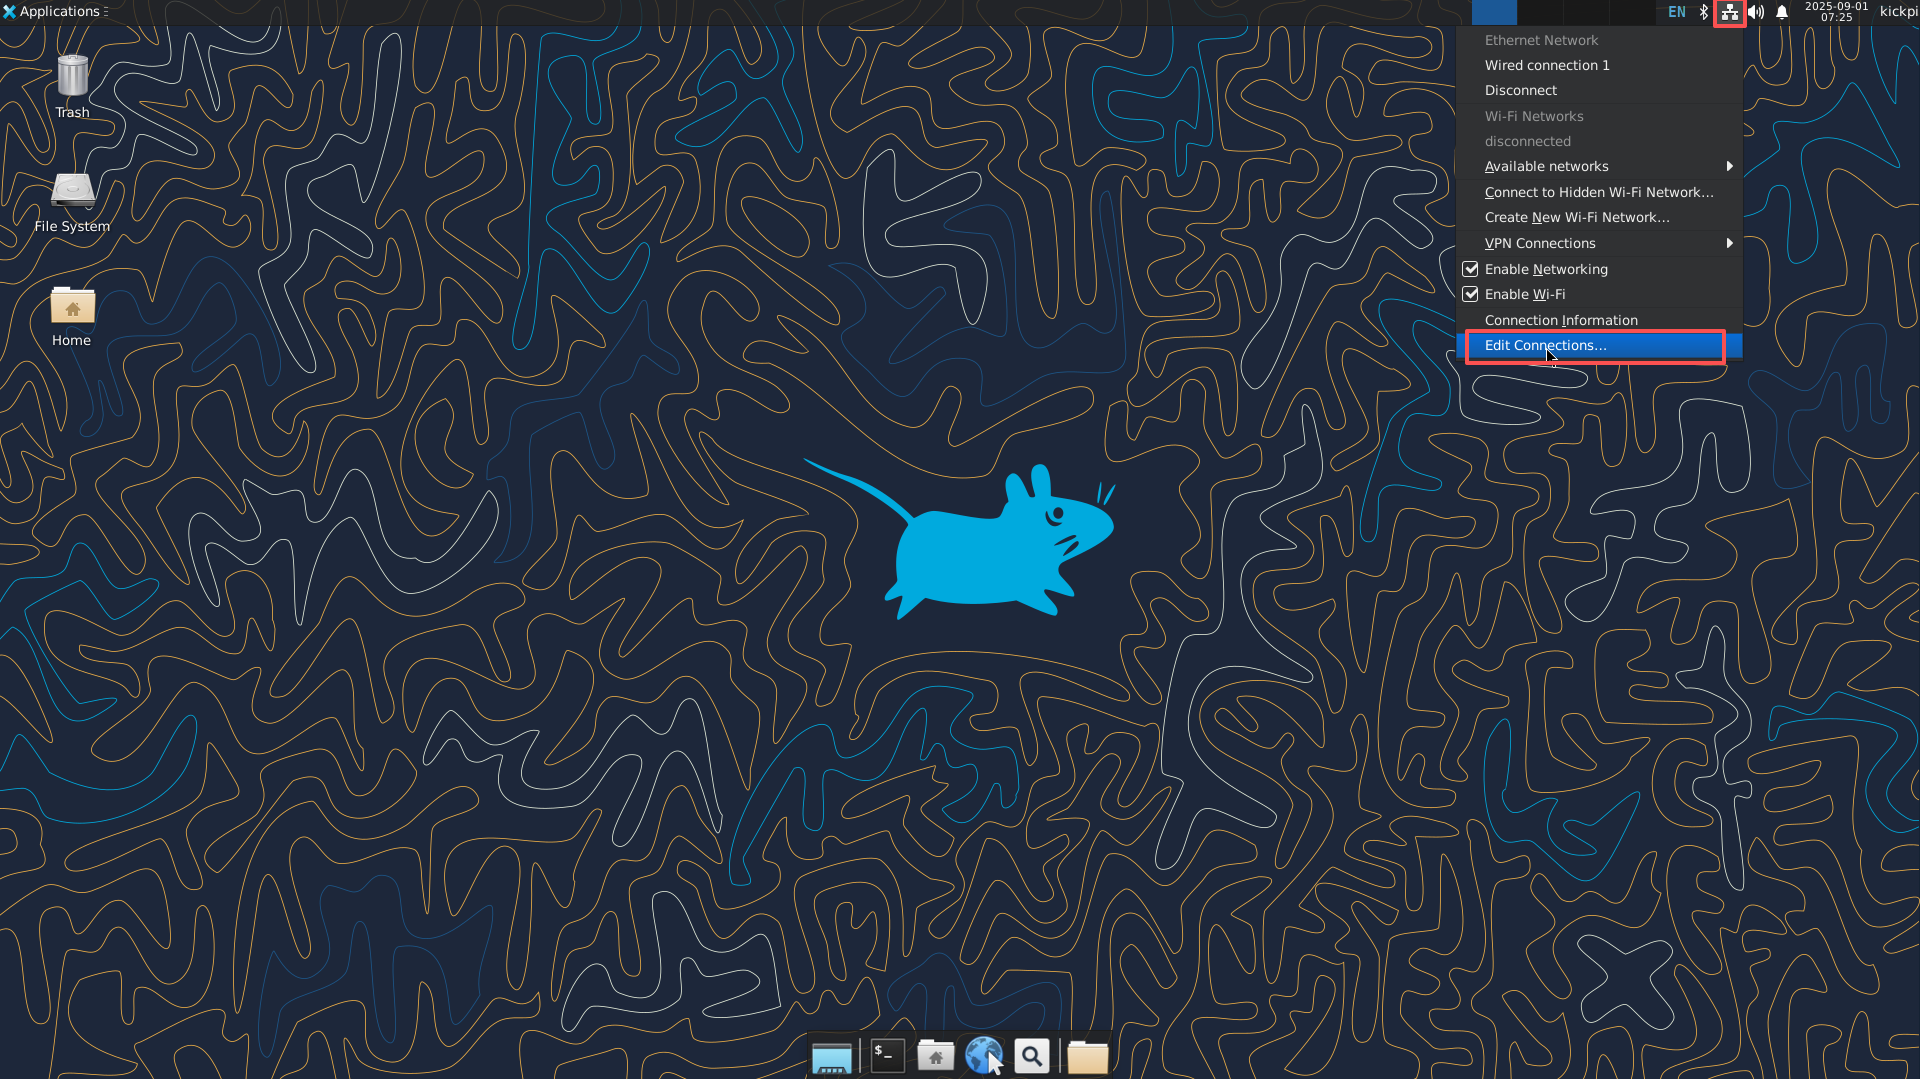
图像化界面配置WIFI热点
1. 连接以太网,打开图像化网络配置界面(Debian:鼠标右键点击“两台PC图标”)
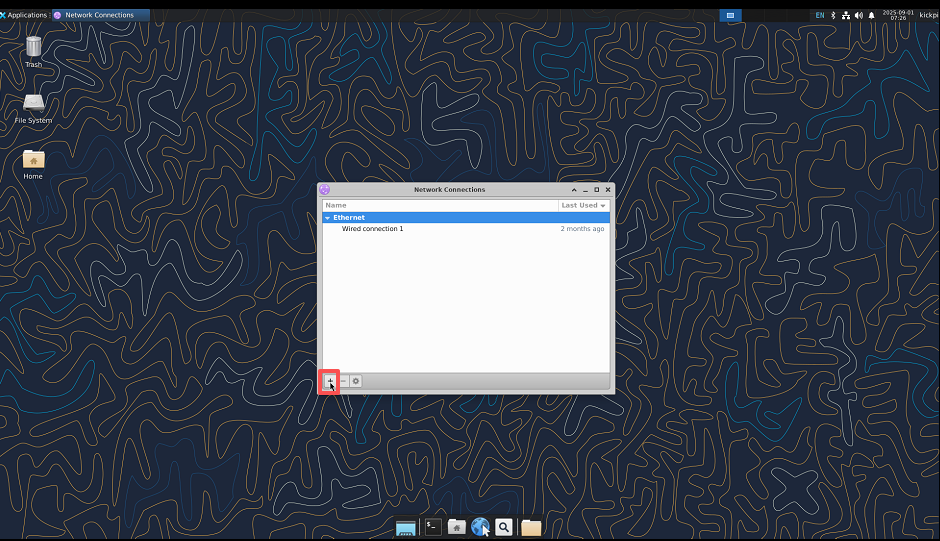
2. 添加WiFi节点
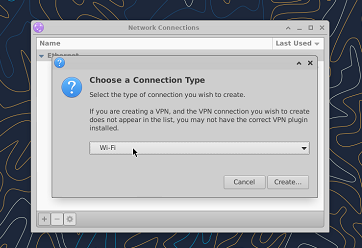
3. 选择Wi-Fi类型
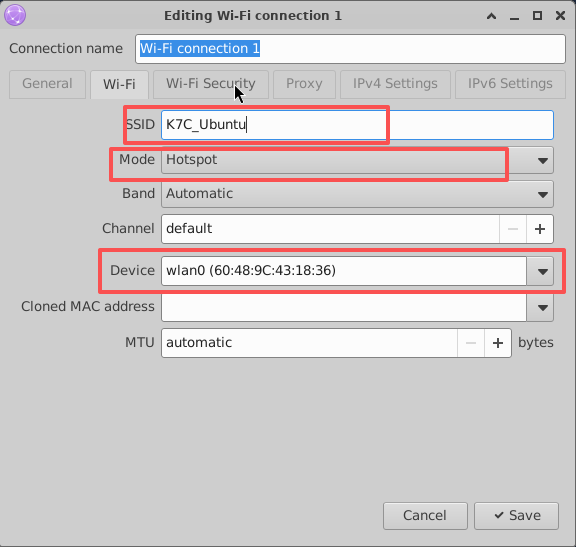
4. 进行WiFi网络节点配置
Note
SSID:WiFi名称
Mode:模式
Device:使用的设备
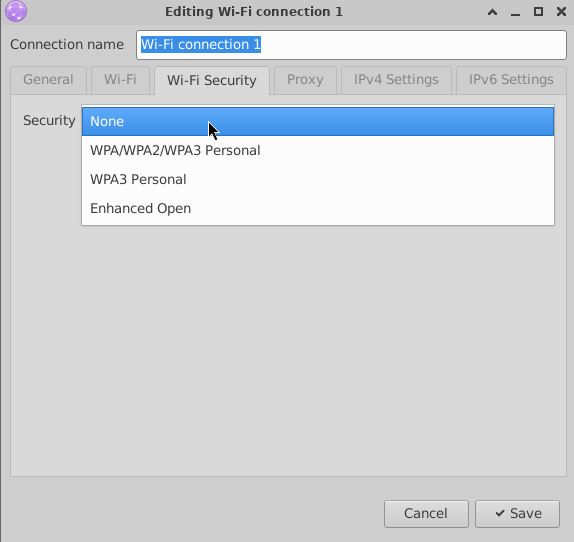
5. 配置WiFi热点的安全属性
Note
None: 无密码
WPA/WPA2/WPA3 Personal : 常用加密模式
WPA3 Personal: 只支持WPA3
Enhanced Open:公共网络的安全标准
命令行配置WIFI热点(AP)模式
- 查看是否支持AP模式
Tip
AP/VLAN表示硬件支持。
$ iw list | grep AP
Device supports AP-side u-APSD.
         * AP
         * AP/VLAN
        HE Iftypes: AP
        HE Iftypes: AP
         * wake up on EAP identity request
         * AP/VLAN
         * #{ managed } <= 1, #{ AP, P2P-client, P2P-GO } <= 1, #{ P2P-device } <= 1,
    Driver supports full state transitions for AP/GO clients
    Driver/device bandwidth changes during BSS lifetime (AP/GO mode)
         * AP: 0x00 0x10 0x20 0x30 0x40 0x50 0x60 0x70 0x80 0x90 0xa0 0xb0 0xc0 0xd0 0xe0 0xf0
         * AP/VLAN: 0x00 0x10 0x20 0x30 0x40 0x50 0x60 0x70 0x80 0x90 0xa0 0xb0 0xc0 0xd0 0xe0 0xf0
         * AP: 0x00 0x20 0x40 0xa0 0xb0 0xc0 0xd0
         * AP/VLAN: 0x00 0x20 0x40 0xa0 0xb0 0xc0 0xd0
虚拟接口创建热点模式
1. 安装依赖包
2. 创建虚拟网卡
Note
< wirelessname > 是真实无线网卡名,可通过ifconfig查看,< virtualwlanname > 是虚拟的无线网卡名。
操作示例:
3. 为虚拟网卡添加物理地址
Tip
< virtualwlanname >是虚拟的无线网卡名,可随意填写,产生冲突更换命名即可。
操作示例:
4. 查看创建情况
Warning
重启系统后,创建的虚拟网卡会失效。
$ sudo iw dev wlo2 info
   Interface wlo2
    ifindex 5
    wdev 0x5
    addr 22:33:44:55:66:00
    type managed
    wiphy 0
    txpower 0.00 dBm
    multicast TXQ:
        qsz-byt qsz-pkt flows   drops   marks   overlmt hashcol tx-bytestx-packets
        0   0   0   0   0   0   0   0   0
5. 下载安装工具 create_ap
6. 使用create_ap创建热点
Note
< wirelessname > :无线网卡名称
< virtualwlanname > :虚拟网卡名称
< SSID > < password >:热点Wifi名称和密码。
操作示例:
如果创建的热点卡死,开启热点时报如下错误:
#RTNETLINK answers: Device or resource busy
#ERROR: Maybe your WiFi adapter does not fully support virtual interfaces.
# Try again with --no-virt.
停止之前创建的热点,重新启动开启热点。
物理接口创建热点模式
1. 安装依赖和create_ap
$ sudo apt-get install util-linux hostapd dnsmasq iptables iproute2 haveged make
$ git clone https://github.com/oblique/create_ap
$ cd */create_ap
$ sudo make install
2. 修改防火墙
$ sudo update-alternatives --set iptables /usr/sbin/iptables-legacy
$ sudo update-alternatives --set ip6tables /usr/sbin/ip6tables-legacy
$ iptables --version
3. 创建热点MyAccessPoint,密码:12345678,共享eth0网络
4. 使用 create_ap 后恢复 WiFi 节点
NFS配置
- 环境配置
- 服务器端
1. 配置共享的文件
$ mkdir /home/kickpi/nfs_share
$ chmod 777 /home/kickpi/nfs_share
$ vi /etc/exports
+ /home/kickpi/nfs_share *(rw,sync,no_subtree_check,insecure)
2. 启动服务
3. 查看当前服务器共享文件,证明共享成果
- 客户端
1. 查看服务器共享文件
2. 挂载文件夹
3. 挂载成功
Chrome 硬件加速
测试平台:K7 Debian12 Chrome
- 测试方法
1. 拷贝1080P及4K分辨率视频至开发板,通过Chrome浏览器本地解码。
2. 查看GPU占用:
3. 打开帧解码日志并打印:
export mpi_debug=1
export mpp_debug=1
export h264d_debug=1
export mpp_syslog_perror=1
echo 0x100 > /sys/module/rk_vcodec/parameters/mpp_dev_debug
备份rootfs系统
Tip
通过这种方式替换后的rootfs可能存在mount挂载UUID问题,通过blkid查看正确的UUID,修改/etc/fstab。
接好U盘在板子上,大小至少16GB以上,打包出来的镜像会比较大
1. 插入U盘(≥ 16GB),将脚本拷贝至开发板Linux系统上运行
Note
生成包名格式:例如 rootfs.img。 /mnt/usb :U盘挂载目录。
2. 确保打包出来的文件格式正确
Tip
FAT32单文件不可超出4G,如果系统太大,请格式化U盘为ext4、exfatg格式。
$ file Ubuntu_24.04.2_LTS_ext4_202503062020.img
Ubuntu_24.04.2_LTS_ext4_202503062020.img: Linux rev 1.0 ext4 filesystem data, UUID=71584b93-ad99-452e-a8e2-6b9ed76eff7d, volume name "rootfs" (extents) (64bit) (large files) (huge files)
3. 重新打包,将rootfs.img替换进完整镜像,参考固件解包和打包;也可单独烧录rootfs.img,烧录完成后,根文件系统占用的存储空间与镜像文件(img)大小一致,执行命令还原大小。
eMMC分区
Warning
重新分区均需要重新烧录,如需保留系统,不进行格式化,请先备份rootfs。
可通过两种方式完成修改:
- 完整镜像修改
参考固件解包和打包,修改parameter.txt文件后重新打包。
- SDK内修改
对应路径下文件修改完成后,重新编译。
RK3576:
修改内容:
重新分区主要修改分区文件parameter.txt
操作示例:将剩余所有空间放至根目录下
mtdparts=:0x00002000@0x00004000(uboot),0x00002000@0x00006000(misc),0x00020000@0x00008000(boot),0x00040000@0x00028000(recovery),0x00010000@0x00068000(backup),-@0x00078000(rootfs:grow)
Note
文件分区规则:
分区大小:0x01c00000*512Byte/1024/1024/1014 ≈ 14G
分区起始地址:前一个分区起始地址+前一个分区大小
最后一个分区格式为:-@0x0xxxxx(xxx:grow) -表示剩余所有空间自适应。
Linux系统需要额外增加一步修改,注释oem userdate的自动挂载。
4G/5G配置
脚本配置
4G/5G移动模块开机自动配置,检测模块是否存在,进行配置拨号
Tip
开机默认仅会拨号一次,在信号不好或通讯异常情况,可能会存在拨号失败的情况,若无网络,可运行拨号脚本进行重试。
(console)$ cat /usr/bin/hardware-optimization
4g_config() {
    wait_time=30
        for((i=1;i<=$wait_time;i++));
        do
                if [ -c /dev/ttyUSB2 ]; then
                        echo "$i: 4g /dev/ttyUSB2 exists and is a character device." >> $LOG_FILE
                        /usr/bin/4G_dialing.sh
            break;
                else
                        echo "$i: 4g /dev/ttyUSB2 does not exist or is not a character device." >> $LOG_FILE
                        sleep 1
                fi
        done
}
拨号脚本,已适配 RG200U / EC200 / EC20
RG200U由模块自动拨号,可通过强制配置并重启此模块
Warning
此操作会重置模块,需要等待 /dev/ttyUSB2 重新挂载后,4G_dialing.sh 重新进行拨号配置
1. $ 4G_dialing.sh force
2. 等待 /dev/ttyUSB2
3. $ 4G_dialing.sh
网络测试
1. 判断是否接入模块,查看日志进行判断。
Tip
/dev/ttyUSB2 exists and is a character device.代表设备识别成功
$ cat /tmp/kickpi-hardware.log
1: 4g /dev/ttyUSB2 does not exist or is not a character device.
2: 4g /dev/ttyUSB2 does not exist or is not a character device.
...
24: 4g /dev/ttyUSB2 does not exist or is not a character device.
25: 4g /dev/ttyUSB2 exists and is a character device.
或查看/dev/ttyUSB2 是否存在
2. 判断是否拨号成功
Tip
设备名称格式为 enx*(* 为可变后缀),具体名称请参照实际环境。
(console)$ ifconfig
enxca7f24fb0e94: flags=4163<UP,BROADCAST,RUNNING,MULTICAST>  mtu 1500
        inet 10.138.192.102  netmask 255.255.255.0  broadcast 10.138.192.255
        inet6 fe80::583f:ed51:782d:318d  prefixlen 64  scopeid 0x20<link>
        ether ca:7f:24:fb:0e:94  txqueuelen 1000  (Ethernet)
        RX packets 181  bytes 15185 (14.8 KiB)
        RX errors 0  dropped 0  overruns 0  frame 0
        TX packets 194  bytes 17394 (16.9 KiB)
        TX errors 0  dropped 0 overruns 0  carrier 0  collisions 0
3. Ping网络测试
Tip
指定设备 enx3e003a5bd6ad 进行ping网络测试。
(console)$ ping www.baidu.com -I enxca7f24fb0e94
PING www.wshifen.com (103.235.46.115) from 10.138.192.102 enxca7f24fb0e94: 56(84) bytes of data.
64 bytes from 103.235.46.115 (103.235.46.115): icmp_seq=1 ttl=45 time=1094 ms
64 bytes from 103.235.46.115 (103.235.46.115): icmp_seq=2 ttl=45 time=3924 ms
64 bytes from 103.235.46.115 (103.235.46.115): icmp_seq=3 ttl=45 time=1870 ms
GPU
- ARM Mali-G52 MC3 GPU 核心规格与支持 API
- 查看GPU使⽤率
操作示例:
实时监测 GPU 使用率,通过移动鼠标、拖动窗口或运行 GPU 专项测试的方式,即可判断硬件加速功能是否成功启用
- GLmark2 性能测试
1. 使用 Rockchip官方提供的 npu 测试脚本
$ ls /rockchip-test/gpu
gpu_test.sh  test_fullscreen_glmark2.sh  test_normal_glmark2.sh test_offscreen_glmark2.sh  test_stress_glmark2.sh
2. Debian / Ubuntu 文件系统已内置 glmark2-es 性能测试工具,使用虚拟终端或调试串口终端,执行以下命令开始 GPU 性能测试
Tip
800x600 glmark2 测试分数为1405。
测试结果仅做参考,实际分数以实际测量为准。
root@linaro-alip:/# source /rockchip-test/gpu/test_offscreen_glmark2.sh
run glmark2 x11 with offscreen......
arm_release_ver: g13p0-01eac0, rk_so_ver: 10
=======================================================
    glmark2 2023.01
=======================================================
    OpenGL Information
    GL_VENDOR:      ARM
    GL_RENDERER:    Mali-G52
    GL_VERSION:     OpenGL ES 3.2 v1.g13p0-01eac0.0fd2effaec483a5f4c440d2ffa25eb7a
    Surface Config: buf=32 r=8 g=8 b=8 a=8 depth=24 stencil=0 samples=0
    Surface Size:   800x600 windowed
=======================================================
=======================================================
                                  glmark2 Score: 1405
=======================================================
NPU
- 核心参数
6 TOPS*@INT8
Support int4/int8/int16/FP16/BF16/TF32
Support deep learning frameworks: TensorFlow, Caffe, Tflite, Pytorch, Onnx NN, Android NN, etc
- Debian / Ubuntu
Rockchip 提供 npu 测试脚本
npu 频率测试脚本 npu_freq_scaling.sh
usage()
{
    echo "Usage: npu_freq_scaling.sh [test_second] [every_freq_stay_second]"
    echo "example: ./npu_freq_scaling.sh 3600 30"
    echo "means npu_freq_scaling.sh will run 1 hour and every cpu frequency stay 30s"
}
操作示例:npu变频运行60秒,每10秒变频一次
# ./npu_freq_scaling.sh 60 10
test will run 60 seconds
every npu frqeucny will stay 10 seconds
set ddr frequency to 700000000
set ddr frequency to 300000000
set ddr frequency to 700000000
set ddr frequency to 950000000
set ddr frequency to 500000000
set ddr frequency to 700000000
======TEST SUCCESSFUL, QUIT=====
npu 压力测试脚本 npu_stress_test.sh
# ./npu_stress_test.sh
rknn_api/rknnrt version: 2.0.0b0 (35a6907d79@2024-03-24T10:31:14), driver version: 0.9.7
model input num: 1, output num: 1
input tensors:
  index=0, name=input, n_dims=4, dims=[1, 224, 224, 3], n_elems=150528, size=150528, fmt=NHWC, type=INT8, qnt_type=AFFINE, zp=0, scale=0.007812
output tensors:
  index=0, name=MobilenetV1/Predictions/Reshape_1, n_dims=2, dims=[1, 1001, 0, 0], n_elems=1001, size=2002, fmt=UNDEFINED, type=FP16, qnt_type=AFFINE, zp=0, scale=1.000000
custom string:
Begin perf ...
   0: Elapse Time = 2.85ms, FPS = 351.12
   1: Elapse Time = 2.70ms, FPS = 370.37
   2: Elapse Time = 2.59ms, FPS = 386.85
   3: Elapse Time = 2.69ms, FPS = 371.61
   4: Elapse Time = 2.62ms, FPS = 381.97
   5: Elapse Time = 2.61ms, FPS = 383.44
   6: Elapse Time = 2.58ms, FPS = 387.75
   7: Elapse Time = 2.70ms, FPS = 370.51
   8: Elapse Time = 2.64ms, FPS = 378.36
   9: Elapse Time = 2.68ms, FPS = 372.44
---- Top5 ----
0.935059 - 156
0.057037 - 155
0.003881 - 205
0.003119 - 284
0.000172 - 285
Note
性能测试数据解读:
在 Begin perf... 之后的内容,为模型多次推理的性能指标明细,每项数据包含测试轮次序号、单次推理耗时(Elapse Time)以及每秒推理帧数(FPS)。
以 0: Elapse Time = 2.85ms, FPS = 351.12 为例,其含义为第 1 轮模型推理的耗时为 2.85 毫秒,折算后每秒可完成 351.12 次推理运算。其中,FPS 的计算逻辑为1000ms ÷ 单次推理耗时,表征 NPU 的推理效率。
推理结果数据解读:
---- Top5 ----部分为模型推理输出的置信度排名前五的分类结果,每项数据由「类别置信概率」与「类别编号」两部分组成,具体含义如下:
1. 0.935059 - 156:模型判定输入样本属于编号 156 类别的置信概率为 93.51%,该概率值处于较高水平,反映模型对该分类结果的判定可信度高;
2. 后续条目 0.057037 - 155、0.003881 - 205、0.003119 - 284、0.000172 - 285,依次为置信度排名第 2 至第 5 的分类结果,其置信概率呈逐级递减趋势,对应模型对这些类别判定的把握程度逐步降低。
RKNN 部署
系统支持部署 rknn-toolkit2,rknn_model_zoo,点击跳转至 Rockhip 官方文档。
MPP
- 视频编解码(Codec)规格参数
H.265 HEVC Main10 L5.1 yuv444: 4K 120fps
H.264 AVC High10 L5.1 yuv422: 4K 60fps
H.264 MVC up to 1080P 60fps
VP9 Profile0/2 L5.1: 4K 120fps
AVS2 Profile0/2 L10.2.6: 4K 120fps
AV1 Main10 L5.3: 4K 120fps
4K@60fps video encoders for H.264/H.265
- 调试信息
开启调试信息
$ export mpp_syslog_perror=1
$ echo 0x100 > /sys/module/rk_vcodec/parameters/mpp_dev_debug
//开启调试信息后,调用硬件编解码会有类似如下日志信息
[  893.134037] rk_vcodec: 27b00100.rkvdec:0 session 3705:19 time: 1333 us hw 1312 us
[  893.167444] rk_vcodec: 27b00100.rkvdec:0 session 3705:19 time: 1381 us hw 1313 us
[  893.200503] rk_vcodec: 27b00100.rkvdec:0 session 3705:19 time: 1420 us hw 1313 us
关闭调试信息
- mpi_enc_test 硬编码测试
usage: mpi_enc_test [options]
 -i       input_file          input frame file
 -o       output_file         output encoded bitstream file
 -w       width               the width of input picture
 -h       height              the height of input picture
 -hstride hor_stride          the horizontal stride of input picture
 -vstride ver_stride          the vertical stride of input picture
 -f       format              the format of input picture
 -t       type                output stream coding type
 -tsrc    source type         input file source coding type
 -n       max frame number    max encoding frame number
 -g       gop reference mode  gop_mode:gop_len:vi_len
 -rc      rate control mode   set rc_mode, 0:vbr 1:cbr 2:fixqp 3:avbr
 -bps     bps target:min:max  set tareget:min:max bps
 -fps     in/output fps       set input and output frame rate
 -qc      quality control     set qp_init:min:max:min_i:max_i
 -fqc     frm quality control set fqp min_i:max_i:min_p:max_p
 -s       instance_nb         number of instances
 -v       trace option        q - quiet f - show fps
 -l       loop count          loop encoding times for each frame
 -ini     ini file            encoder extra ini config file
 -slt     slt file            slt verify data file
 -sm      scene mode          scene_mode, 0:default 1:ipc
编码H.264 4096x2160 100帧测试
测试结果
$ tail -f /var/log/syslog
kickpi mpp[3557]: mpi_enc_test: chn 0 encode 100 frames time 3763 ms delay  27 ms fps 26.57 bps 10605252
编码H.265 4096x2160 100帧测试
测试结果
$ tail -f /var/log/syslog
kickpi mpp[3560]: mpi_enc_test: chn 0 encode 100 frames time 4086 ms delay  36 ms fps 24.47 bps 19594276
- mpi_dec_test 硬解码测试
 usage: mpi_dec_test [options]
 -i       input_file   input bitstream file
 -o       output_file  output decoded frame file
 -w       width        the width of input bitstream
 -h       height       the height of input bitstream
 -t       type         input stream coding type
 -f       format       output frame format type
 -n       frame_number max output frame number
 -s       instance_nb  number of instances
 -v       trace option q - quiet f - show fps
 -slt     slt file     slt verify data file
 -help    help         show help
 -bufmode buffer mode  hi - half internal (default) i -internal e - external
解码H.264 4096x2160 100帧测试
测试结果
$ tail -f /var/log/syslog
kickpi mpp[3564]: mpi_dec_test: decode 100 frames time 596 ms delay  25 ms fps 167.53
解码H.265 4096x2160 100帧测试
测试结果
$ tail -f /var/log/syslog
kickpi mpp[3569]: mpi_dec_test: decode 100 frames time 803 ms delay  49 ms fps 124.47
- Chromium视频测试
主板连接显示器,打开虚拟终端或调试串口终端,执行以下命令开始 Chromium 视频测试
默认配置 chromium 进行调用,若chromium未调用硬解码,需要以下命令进行修复
- gstreamer视频测试
$ sudo GST_DEBUG=2 gst-launch-1.0 playbin uri=file:///usr/local/test.mp4 video-sink="autovideosink" audio-sink=fakesink
Tip
ubuntu 中 rockchip chromium 和 gstreamer 配置硬解码存在兼容性问题。
默认配置 chromium 进行调用,若需要 gstreamer 调用硬解码,需要以下命令进行修复(联网环境下进行)
GCC⼯具链
安装命令
常见问题
- Linux系统烧录后第一次开机重启 ?
通⽤Debian为了兼容不同芯⽚,/etc/init.d/rockchip.sh 首次启动时,会根据芯⽚安装各种差异包,例如 libmali 、isp等packages,安装完成后会重启显⽰服务。 如果是独⽴项⽬可以在制作镜像时处理这部分差异即可。
- create_ap出现dnsmasq报错?
创建过程中遇到报错问题
因为create_ap 需要启动 dnsmasq,但是dnsmasq已经启动了
找到dnsmasq对应的PID
- create_ap iw 版本6.7 以上兼容补丁问题?
@@ -321,9 +321,9 @@ can_transmit_to_channel() {

    if [[ $USE_IWCONFIG -eq 0 ]]; then
        if [[ $FREQ_BAND == 2.4 ]]; then
-           CHANNEL_INFO=$(get_adapter_info ${IFACE} | grep " 24[0-9][0-9] MHz \[${CHANNEL_NUM}\]")
+           CHANNEL_INFO=$(get_adapter_info ${IFACE} | grep " 24[0-9][0-9]\(\.0\+\)\? MHz \[${CHANNEL_NUM}\]")
        else
-           CHANNEL_INFO=$(get_adapter_info ${IFACE} | grep " \(49[0-9][0-9]\|5[0-9]\{3\}\) MHz \[${CHANNEL_NUM}\]")
+           CHANNEL_INFO=$(get_adapter_info ${IFACE} | grep " \(49[0-9][0-9]\|5[0-9]\{3\}\)\(\.0\+\)\? MHz \[${CHANNEL_NUM}\]")
        fi
        [[ -z "${CHANNEL_INFO}" ]] && return 1
        [[ "${CHANNEL_INFO}" == *no\ IR* ]] && return 1
@@ -339,7 +339,9 @@ can_transmit_to_channel() {

# taken from iw/util.c
ieee80211_frequency_to_channel() {
-   local FREQ=$1
+   local FREQ_MAYBE_FRACTIONAL=$1
+   local FREQ=${FREQ_MAYBE_FRACTIONAL%.*}

    if [[ $FREQ -eq 2484 ]]; then
        echo 14
    elif [[ $FREQ -lt 2484 ]]; then
@@ -356,7 +358,7 @@ ieee80211_frequency_to_channel() {
}

is_5ghz_frequency() {
-    [[ $1 =~ ^(49[0-9]{2})|(5[0-9]{3})$ ]]
+   [[ $1 =~ ^(49[0-9]{2})|(5[0-9]{3})(\.0+)?$ ]]
}